


Most homeowners in Woodland Park, NJ spend a lot of time on their kitchens and bathrooms. But the basement? It usually gets ignored. That’s a missed opportunity. A finished, well-coated basement adds real living space to your home. It also protects one of the most vulnerable surfaces in the house.
Basement floors take a beating. Moisture seeps up through the concrete. Temperature swings cause cracking. Heavy storage leaves marks and stains. Without the right protection, a bare concrete floor gets worse every single year.
The good news is that modern floor coatings have come a long way. They’re tougher, more attractive, and longer-lasting than ever before. Whether you want a sleek showroom finish or a tough utility floor, there’s a coating built for your needs.
Many Woodland Park homeowners have discovered that investing in professional concrete polishing services transforms a dull, dusty basement into something genuinely impressive. A polished and coated floor is easier to clean, resistant to moisture damage, and looks sharp for years. It’s one of the highest-return upgrades you can make to your home.
Concrete polishing services don’t just make floors look better. They also strengthen the surface. The process removes weak top layers and creates a dense, sealed finish that resists staining and cracking. That combination of beauty and toughness is exactly what basements need.
Why Basement Floors Are Different From the Rest
Basements sit below grade. That means they’re in constant contact with soil and groundwater. Even in dry seasons, moisture moves through concrete slowly. Over time, that moisture causes serious problems.
Uncoated basement floors collect dust constantly. They stain easily from water, oil, or rust. In colder months, the surface can crack as temperatures shift. None of that is inevitable the right coating stops all of it.
The other challenge is weight. Basements often hold heavy equipment, storage shelving, and appliances. A coated floor handles that load better. It distributes pressure more evenly and resists surface damage from furniture legs and rolling carts.
Think of a floor coating as armor for your concrete. It doesn’t just sit on top it bonds to the slab and becomes part of the surface. That’s why prep work matters so much, but we’ll get to that shortly.
The Most Popular Coating Options Right Now
There’s no single best coating for every basement. The right choice depends on how you use the space, your budget, and how much prep you’re willing to do. Here’s a clear breakdown of the main options.
Epoxy coatings are the most widely used. They bond tightly to concrete, resist chemicals, and clean up easily. You’ve probably seen them in garages that glossy, speckled finish. They work just as well in basements.
Polyurea and polyaspartic coatings are newer and faster. They cure in a matter of hours instead of days. They’re also more flexible than epoxy, which means they handle temperature changes better. Many contractors in Woodland Park now prefer them for residential basements.
Polyurethane coatings are excellent for areas with chemical exposure or constant foot traffic. They’re a bit softer than epoxy, which actually helps with impact resistance.
Concrete stains and sealers are the budget-friendly option. They don’t add a thick protective layer, but they do lock in the surface and add color. Great for utility spaces or light-use basements.
Going Deeper on Basement Epoxy Floor Coating
If you’ve been researching options, you’ve probably come across basement epoxy floor coating more than once. There’s a reason it keeps coming up. It’s genuinely one of the most durable and cost-effective solutions available for residential basements.
Basement epoxy floor coating works by creating a chemical bond with the concrete slab. When applied correctly, it becomes almost inseparable from the floor beneath it. That bond is what gives it such strong resistance to peeling, cracking, and moisture damage.
There are two main types to know about. Water-based epoxy is easier to apply and has lower fumes good for DIY projects. Solvent-based epoxy is stronger and more resistant, but it requires better ventilation and more careful handling.
One of the biggest advantages of basement epoxy floor coating is the decorative flexibility. You can add colored flakes, metallic pigments, or even custom patterns. The result looks like a professionally designed floor, not just painted concrete. Homeowners in Woodland Park are increasingly choosing this option for home gyms, entertainment rooms, and finished basements.
The one downside worth knowing: epoxy can yellow if it gets direct UV exposure. For most basements without windows, this isn’t an issue. But if your basement has window wells or significant natural light, a polyaspartic topcoat can protect against that.
Decorative Finishes That Still Perform
Style matters. A basement that looks great gets used more. And a coating that only looks good but fails quickly is a waste of money. The best decorative finishes do both.
Metallic epoxy is the most dramatic option. Pigments swirl through a clear epoxy base and create a three-dimensional effect. It looks like polished marble or liquid metal. It’s a showstopper in entertainment spaces.
Flake or chip systems are extremely popular for a reason. Colored vinyl chips are broadcast into wet epoxy, then sealed with a clear topcoat. The result is attractive, slip-resistant, and hides dirt well between cleanings. It’s also one of the most durable decorative finishes available.
Acid staining creates earthy, mottled tones that look genuinely unique. No two acid-stained floors look exactly alike. The color penetrates the concrete rather than sitting on top, so it won’t peel or chip. A sealer on top protects the finish.
Stenciling and scoring allow for custom patterns, geometric designs, borders, or faux tile layouts. Combined with a stain or sealer, these techniques give you the look of expensive flooring at a fraction of the cost.
Surface Preparation the Step That Decides Everything
Here’s the hard truth about floor coatings. The prep work matters more than the product. A premium coating applied to a poorly prepped surface will fail. A mid-range coating applied to a perfectly prepped surface will last for decades.
Start with a moisture test. The simplest method is the plastic sheet test. Tape a 2-foot square of plastic to the floor, seal all edges, and wait 24 hours. If moisture collects under the plastic, you have a vapor problem to address before coating.
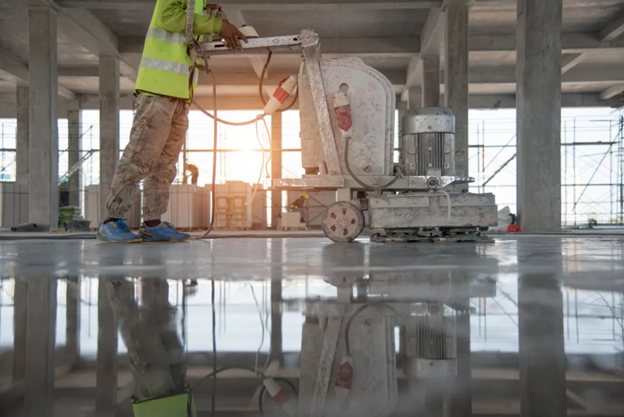
Once moisture is under control, the surface needs to be opened up. Concrete has a tight surface layer that doesn’t accept coatings well without preparation. Grinding is the most reliable method. It removes the weak top layer and creates a profile that coatings grip.
Acid etching is a DIY-friendly alternative. It uses a diluted acid solution to open the concrete pores. It works, but grinding is generally more thorough and consistent.
Fill any cracks or holes before coating. Small cracks can be filled with epoxy filler or polyurea caulk. Larger structural cracks may need professional repair first. Don’t coat over problems fix them.
DIY vs. Hiring a Professional
This is the honest part of the conversation. Some homeowners can handle basic floor coating projects. Others really shouldn’t try.
For a small utility basement with no moisture issues and good surface prep, a DIY epoxy kit can work. The key is following instructions exactly and not rushing. Many failed DIY coatings come down to skipping steps or applying in bad conditions.
But for most finished basements in Woodland Park, hiring a professional makes more sense. A professional brings commercial-grade equipment for grinding and application. They can identify and fix moisture issues before coating. They apply products that aren’t available at hardware stores — and they get better results because of it.
If you’re considering professional help, ask these questions before hiring:
- Do you do moisture testing before coating?
- What’s your surface prep process?
- What brands and products do you use?
- Can you show photos of completed basement projects?
- What warranty do you offer on materials and labor?
A contractor who answers these confidently is worth trusting. One who rushes past them is worth walking away from.
Cost Breakdown What to Expect
Basement floor coating costs vary based on size, coating type, and surface condition. Here’s a realistic guide for Woodland Park homeowners.
DIY epoxy kits: $1.50–$3.00 per square foot in materials. Good for small spaces and simple applications.
Professional epoxy coating: $3.00–$7.00 per square foot installed. Includes surface prep and multiple coats.
Polyurea/polyaspartic coating: $5.00–$10.00 per square foot. Premium product, faster install, longer lifespan.
Decorative metallic epoxy: $8.00–$15.00 per square foot. High-end finish, usually reserved for entertainment or showcase spaces.
Always factor in surface repair costs. Crack filling, moisture remediation, and heavy grinding can add to the base price. Get a detailed written quote before agreeing to anything.
The upside is longevity. A properly applied professional coating lasts 10–20 years with minimal maintenance. When you spread that cost over two decades, it’s genuinely affordable.
Choosing the Right Coating for Your Basement’s Purpose
Different basements need different coatings. Here’s a simple guide.
Home gym: Choose a textured polyurea or rubber tile system. You need slip resistance and impact absorption. A smooth epoxy might look great but gets slippery when wet.
Entertainment room or man cave: Go decorative. Metallic epoxy or a flake system gives you that polished, finished look. Add area rugs for warmth.
Workshop or utility room: Heavy-duty epoxy or polyaspartic is your best option. Prioritize chemical resistance and durability over appearance.
Laundry or mechanical room: A waterproof polyurethane or epoxy sealer keeps moisture out and makes cleanup simple. No need for decorative finishes here.
Storage room: A basic concrete sealer or thin epoxy coat is enough. It controls dust and moisture without a big investment.
Maintenance Tips That Actually Make a Difference
A coated floor is easy to maintain. But “easy” doesn’t mean “no effort at all.” Sweep or dust mop regularly. Grit and dirt act like sandpaper under foot traffic. Removing it often keeps the finish looking newer longer. For cleaning, warm water and a pH-neutral cleaner work best. Avoid bleach, ammonia, or anything abrasive. These can dull or degrade the topcoat over time.
Place felt pads under heavy furniture. Even coated floors can scratch under concentrated point pressure. It’s a small step that prevents visible damage. Recoat the topcoat every 5–10 years depending on traffic levels. The base coat may still be perfect a fresh topcoat restores the gloss and extends the life of the whole system.
Deal with chips or scratches early. Small damage is easy to repair. Large areas of peeling or delamination are a much bigger project. Catch problems while they’re small.
Common Mistakes
Skipping the moisture test is the most expensive mistake. A coating that bubbles or peels six months after installation is almost always a moisture problem. Test first, always. Applying in cold or humid conditions is another common error. Most coatings need temperatures above 50°F and relative humidity below 85% to cure properly. Check the conditions before you start.
Using the wrong primer or skipping it entirely leads to adhesion failure. Always follow the manufacturer’s system primer, base coat, topcoat in the right sequence. Rushing between coats causes delamination. Each layer needs proper cure time before the next goes down. Patience during installation means decades of performance afterward. And finally don’t choose purely on price. The cheapest coating in a big-box store is not the same product a professional uses. Material quality matters enormously in floor coatings.
Final Thoughts
Your basement floor has more potential than you probably realize. The right coating turns raw, dusty concrete into a surface that’s tough, clean, and genuinely attractive.
Whether you’re finishing a home gym, creating an entertainment space, or just protecting a utility area, there’s a coating solution that fits. Start with your moisture situation. Know your purpose. Set a realistic budget. And if the project is bigger than a simple DIY job call a professional.
Woodland Park homeowners who invest in quality basement floor coatings consistently say it’s one of the smartest upgrades they’ve made. It changes how the space feels and how much it gets used. That’s exactly what a good home improvement should do.
